
Topics Discussed On This Page
* Why Camp In The Tree Canopy!?
* Tree Camping Orientation Video
* How To Choose Your Hammock
* Choosing A Tarp
* The Gear
* Climbing Into A Tree
* Camping In The Canopy
* Do It
I will answer your question with a question. If you are camping alone and find yourself surrounded by blood hungry werewolves or brain eating mummies would you rather be hanging 2 feet above the ground or 50 feet up in a tree? I rest my case. Haha. But seriously, if you have to ask this question tree camping is not for you.
Watch TREEfool‘s Silly Orientation Video
Direct video link:http://youtu.be/hyZJvpogWKQ
OPTION 1: Buy a factory made hammock. I do not like this option since most attachment points on store bought hammocks are not very bombproof. In other words, factory made hammocks are not build for tree camping. This is my least favorite option.
.
OPTION 2: I started tree camping with a traditional gathered end hammock that I built for $12 (Link). I took a rectangular piece of nylon and tied a short piece of webbing to each end, done. I disliked this hammock because it required a very long footprint which made it difficult to find a good spot in the canopy, it was unstable to enter and exit, and it was quite hard to move around in. This is a great option for first time tree campers because the ends are tied making them much less likely to fail versus sewn seams.
.
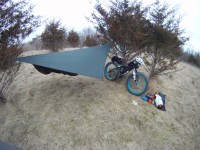
OPTION 3: A portaledge is simply a fully framed hammock which hangs from one point. The fact that it only uses one anchor point made tree selection very easy. So what was the price? I made my first ledge for $17 using an old aluminum cot from craigslist and tying it up with some old webbing I had laying around. My second portaledge was made from a light but bomber aluminum cot that I bought from a store for $70. I then added a cheap solo tent that fit perfectly on this cot and it worked beautifully! See: portaledge video. I ended up turning away from this system for a year because I didn’t like the bulkiness and weight. During this time I tree camped using “Option 4” below. HOWEVER! As of August 2014 I decided to switch back to using a portaledge for the following reason:
The problem was that I stopped tree camping as regularly because I didn’t get very good sleep using “Option 4” (even though it was much better than options 1 and 2! I got fed up and decided that a good nights sleep was the #1 most important thing to me so I switched back to a portaledge. If you plan to buy a portaledge I recommend RUNOUT Customs. He is a climber who is passionate about sleeping high in the sky and his customer service can’t be touched by other companies. Oh, and he currently sells the cheapest double portaledge available! I decided to build my own portaledge (Easy DIY Portaledge) with a legit silnylon rainfly! It is extremely compact, light, and comfortable 😀
.
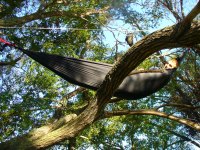
OPTION 4: Next is a modified bridge hammock and if you own a sewing machine this is what I recommend to use for tree camping. My total price was $25. It is easy to build and outperforms the other three in almost every manner. Check out my latest version of The MONSTER PROOF hammock SYSTEM!
.
OPTION 5: The Single Point Hammock! I began testing this hammock in July 2015. I was very skeptical of a single point hammock because I feared the potential shoulder squeeze while sleeping. However, Tom Claytor has introduced the Mosquito Hammock Bat Hammock as a comfort oriented single point hammock that was designed for climbing purposes!!! The best part? The hammock only costs $160 and you can’t argue with that price. I am in the earliest stages of testing but from what I have seen so far I am pretty sure that this style of hammock IS the future of tree camping. Visit this link: https://treefool.com/2015/08/01/video-mosquito-hammocks-bat-hammock-review/ if you want to see a full video review of the Bat Hammock being tested up in the tree canopy.

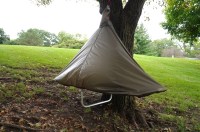
A traditional tarp is very hard to pitch in a tree canopy. Either there are too many branches that get in the way or there aren’t enough to guy out a tarp. I had a blue plastic tarp (the kind you buy at Home Depot) and used this for my first couple trips since I didn’t want to hurt my expensive C.C.S. tarp. After battling with setting up the blue tarp I decided to convert it into a tarp sock. WOW did that work great (see it in action)!
The tarp sock is not very good in the summer though (ok, it is impossible to use in the summer, way too hot!). So after two years of experimentation and doodling I built a weatherproof, bugproof, and totally breathable tarpsock. Check it out: the perfect tarpsock.
After a year of testing out my DIY tarpsock I found a few flaws in it (it is very noisy in the wind!). Since that time I had began making tent-like tarps for my portaledges which were fantastic for tree camping since they stayed taught and didn’t need any guy-out points. I am currently working on a similar concept for my newly acquired single point hammock and I think it will be perfect! Stay tuned for more information.
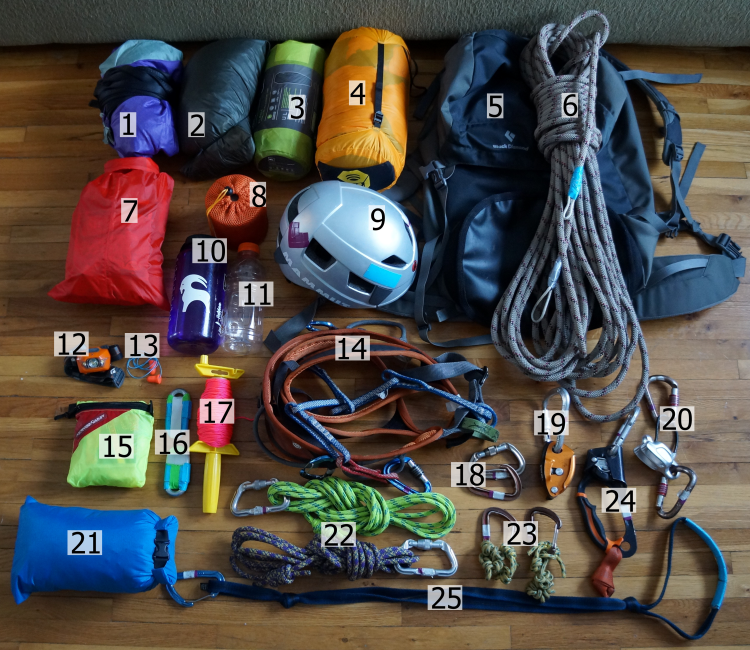
1– Homemade Bridge Hammock with pad sleeve. Check out the hammock details here: 4 point tree camp hammock. This is my latest version: UL 3 point hammock tutorial.
2– Cooke Custom Sewing tarp, 1.1oz, 8×10′. I now use a tarpsock/bugnet: the perfect tarpsock.
3– REI Flash pad L. This is a superlight pad that uses a small amount of synthetic insulation and three beautiful inches of air in case I find myself in a treeless location.
4– Mountain Hardwear Ultralamina 32*. I replaced my superduper ultralight 800fill Montbell down bag with this beast. Same temperature rating, 1/5 the price, dries DAYS faster with the only negatives being 15 ounces heavier and less compressability.
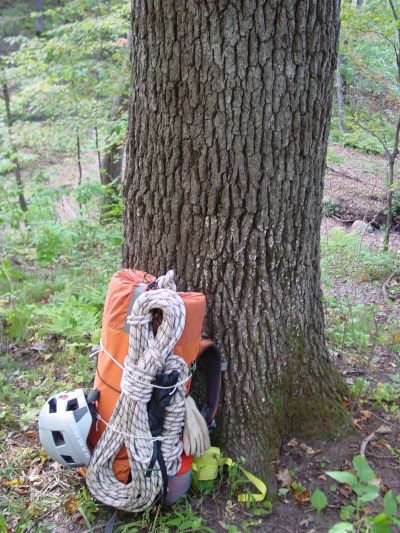
5– Black Diamond 50 Caliber pack. This is probably my favorite piece of gear I ever owned. It is very simple which makes it light, it has a haulbag bottom with super thick body material, and it is so comfy. I have beat the crap out of this pack for three years (rock climbing twice a week) and the only sign of wear is the waterproof coating delaminating on the inside. BD better never stop making this pack because if this one ever dies I will want another one.
6– PMI 11mm EZ Bend static rope. Just 100 feet for lighter pack weight. I rarely find myself wishing I had a longer rope.
7– Food bag. You can get a 3 pack of silnylon drybags from Sportsman’s Guide for $5!
8– Primus Micron Ti stove, Backcountry Ti pot, one MSR fuel canister, and matches. Everything fits inside the little pot. This is a great compact setup but you can go lighter for way cheaper (penny stove as one example).
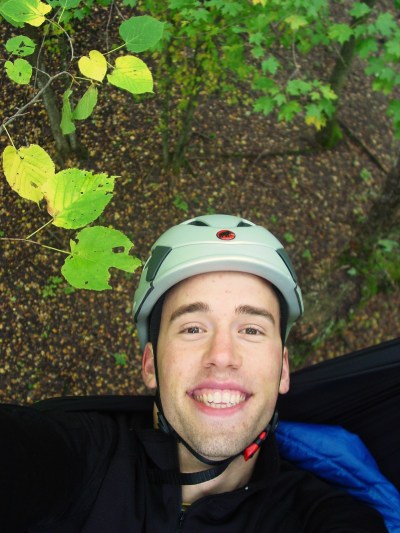
9– Mammut Tripod Helmet. This helmet needs to be replaced but I am too attached to retire it.
10– Nalgene. Depending on the location I may bring a waterbladder too.
11– Pee bottle!!!
12– Black Diamond Storm. Why does BD make such good stuff!? I got this lamp as a present and quickly upgraded my wifes to the same thing. Waterproof, bright, light, and good battery life.
13– Earplugs (I’m a light sleeper)
14– Petzl Sama climbing harness. Allow me to explain why I hate tree climbing harnesses linke (UNDER CONSTRUCTION)
15- First Aid kit. After graduating from medic school I realized that most kits sold in stores are completely useless for backpacking. Click here to see my homemade kit (UNDER CONSTRUCTION).
16– Throw weights.
17– Throwline. DON’T buy the expensive stuff! I bought 300′ of this from Home Depot for $12 and I have yet to notice any differences.
18– Extra biners.
19– Petzl Grigri.
20– Black Diamond ATC Guide.
21– Extra clothes. For most short summer trips I just bring a synthetic fill sweater and a light duty rain jacket. There is no need for extra socks, pants, etc unless you are staying out for over two or three days.
22– Anchor Cords. I recommend using a lanyard instead of multiple anchor cords. Anchor Cords were my way of attaching myself to the tree when I had to unclip from the main climbing rope to advance it higher into the canopy. A better option is to use a lanyard since they are easily adjustable and much faster to deploy.
23– Emergency prusik loops.
24– Petzl ascender.
25– Footloop for ascending.
If you understand the general concepts of tree climbing visit the climbing page to choose a technique that best fits your needs and budget: “-climbing gear & techniques.”
In camp I usually use the tree to climb instead of the ropes. This means that I am always feeding out slack or taking in slack to keep my rope tight. If you have slack in your rope (a static rope, not dynamic) and you fall you could hurt yourself very bad. Even if the line is tight and you slip off of a limb you will go for a big swing and hit anything in your path. This is why learning to climb from a good mentor is important.
Cooking in the tree canopy can be easily accomplished but I only bring a stove about half the time. Even when I am staying in a tent on the ground I prefer to eat cold food versus cooking because I hate cleaning dishes! However, in the coldest months of Minnesota cooking food gives me something to do in the extended night hours so I have figured out multiple options for no-clean-up foods to cook while climbing.
If I could afford Mountain House meals for all of my excursions I would probably just do that. But I like finding cool new food ideas to make my adventures even more adventurous. It really boils down to what type of food you prefer (see what I did there?) but I’m a vegetarian and have a tough time finding “Just Add Water” meals that are high protein without the meat. A few of my favorites are Mac&Cheese cups and Quaker Oats Medleys. Also, if you watch the “cooking while climbing” tutorial below you will see that I use pre-made boxed soups. When climbing, it doesn’t matter whether the weight of water is in your waterbottle or already in the soup because you won’t be replenishing your H2O stocks until the climb is over. Check out the video:
https://www.youtube.com/watch?v=Z97zXgBBYiU
Sleeping is the easy part. When buying a harness choose one that you would want to sleep in because, well, you are going to sleep in it. I use a Petzl Sama for most of my big climbs because it is light, compact, squishy, and provides enough padding for most recreational tree climbs. And since you are going to be sleeping in your harness make sure that you are wearing the pants you want to sleep in because I can’t think of any possible way to change pants while wearing a harness. And the most important part!?

A pee bottle. I have no idea how I managed to go backpacking for 6 years without using a pee bottle. I started using one on a trip in Northern Minnesota where we saw temps of minus 50 degrees!!! I realized how freaking awesome it was to empty the bladder without even getting out of bed so I now use one on ALL of my trips!
Seriously, stop looking at your computer and go do it.

Hi ,
I want to have my own climbing gear, but I still don’t know exactly what I have to buy. So here’s my question : How long are your anchor cords???
I cut the overall length of my cord to 20 feet. It is 7mm accessory cord (here is a link to the cord I use: http://www.rei.com/product/767613/new-england-7mm-accessory-cord-package-of-30-feet). Tie the ends together with a double or triple fishermans knot which will give you a loop of about 9 feet in length. I then wrap this loop around a branch and tie a figure-8 with the two ends of the loop. This results in two strands of cord where if one breaks the other is still a solid anchor = redundancy. However, if you are starting out with no gear I would buy your main climbing rope first. You can use this to build your anchor instead (build anchor with one side, climb on the other). I have been receiving a lot of questions about this lately so I am working on a series of videos that will give you a much better explanation.
Hey,
I like your videos! I’ve subscribed on YouTube so keep them coming! I’m wanting to get into tree climbing/camping.. I think it’s so cool. Problem is 1. there is no courses or anything that teaches it that I can find.. (YouTube it is) and two it’s just so much money! I’ve been looking at hammocks and portaledges. I’m happy with the prices on hammocks but looking at Runout Customs prices (and others) is just ridiculous to me. I would be more comfortable in a portaledge but at almost $800 for it and that’s not even including the rainfly.. I live in Canada so shipping on top of that, what a nightmare.. I watched your DIY portaledge tutorial.. Very nicely done!! I wish I was skilled enough to do that because that price I can live with! Care to make me one? hahaha
Haha yes, portaledges are crazy expensive and that is the reason why I decided to start building my own. I have three different portaledge tutorials (a double ledge made from scratch, a single ledge with rainfly, and a “junkyard” portaledge) so depending on which one you were referring to I might actually be interested in selling you a ledge. In fact, I have been considering starting a small business building and selling portaledges. The problem is that they are so time consuming to build that prices wouldn’t be that much better than buying a Black Diamond or Fish ledge. For example, the fully custom double portaledge and rainfly costed about $350 in raw materials and took me probably 30 hours to build! Granted much of that time was spent learning how to do it and I could likely chop that time in half on my next build the final price would still be well above $500. However, the single portaledges that I build are VERY easy to make without any tools so I got the idea to just build and sell the rainfly for all of the guys who want to DIY their own single portaledge. I could likely sell single rainfly’s for under $200 excluding the topcap (the design I use is patented).
I am also considering selling my double portaledge that you can see in the picture on my home page. I could probably give you an awesome deal on it so if you are interested let me know and I will send you an email. But I HIGHLY recommend buying your tree climbing gear first and figuring out how much you enjoy tree climbing before you invest the money in a ledge.
I’m in the process of building my own portaledge. I used some of your ideas. I got a cot from dunhams sports it cost 24.99 also picked up 8 ratchet straps I don’t have a sewing machine so I had to come up with something so I took the hooks of the straps and was able to slide the loop over the bar of the cot. The straps I got a rated to 300 lbs and 900 lb break strength.
This is a great idea for anyone who lacks a sewing machine. Thanks for sharing.
How do you throw your rope onto the next branch after your anchored to the tree?(make a video)
This video will give you a good idea of some of the techniques used to advance the rope into the canopy while climbing: https://www.youtube.com/watch?v=IBDgRkjZ7m0
How do you setup a single point hammock in a tree? Do you have Amy advice for a first time treecamper?
Tie an overhand on a bite in a piece of webbing or cord and girth hitch it around the branch you want to hang your hammock from. It really can’t get any easier with a single point hammock.
Hi Logan I have some questions that I would like to ask you and I was wondering if you would be able to email me so we are ale to talk about them
If I can’t get a mentor to train me how to climb what should I do/resource to go to to learn the fundamentals of learning how to tree climb?
Option 1: join the nearest rock climbing gym.
Option 2: travel to arborist workshops (although they usually don’t cover the basics)
Option 3: purchase a good tree climbing book (read it cover to cover so you don’t miss any important skills)
Hi Logan I really like your site, lots of info and a very cool vibe! good luck too you
Thanks!
Hey there. Just found this site and am very impressed, nice work. I want to start doing this sort of thing and I own a https://www.hammockbliss.com.au/no-see-um-no-more, I’m not good at sewing or DIY projects but am fine with all the climbing techniques. What could you recommend about using a hammock like this? I know its your least preferred option but do they still work ok? Cheers!
Yup, that is what I used when I first started climbing. It is just much harder to protect from the elements and you need to make sure you are always connected to a TAUGHT climbing line so if your hammock fails you don’t shockload the system (which could break your back or break the rope and kill you).
I have looked at most (if not all) of your posts. I have done some work making hammocks of my own. I am currently having difficulty with appropriate spreader bars for my own diy bat hammock. I believe his are made of fiberglass but they look kind of funky (with the almost spiderweb pattern). What is the type/thickness of fiberglass? Or would an aluminum bar be better? Any thoughts?
He uses a hollow fiberglass pole. There is a lot more information on the subject in this thread: http://verticalcamping.com/viewtopic.php?f=13&t=72
Hey tree fool Big fan I want to know how big of a rope to buy Also what mm. And can you do a video on how to repl using the rad system. What kind of locking caribeaner door you recommend
A good size to start with is 120 feet (37m) of 11mm rope. Any aluminum autolocking carabiner will work. I really like the Petzl AMD ball lock carabiner.
Whats the total weight of your backpack?
It varies greatly! My different backpacks weigh between 3 and 6 pounds. My sleep systems weight between 2 and 18 pounds. My insulation (sleeping bag/pad) weighs between 3 & 8 pounds depending on temps. My climbing gear weighs between 5 and 12 pounds depending on how big the climb is. And I have some camping essentials which usually weigh about 2-3 pounds. Each trip that I go on I mix and match these things so giving a good estimate is pretty much impossible.
Quick quedtions
How did you build your cooking stove set up?
Can you control the heat of the stove?
What’s a good budget for gear I want to get into treeclimbing and camping
I stole a big tin bowl from our kitchen, drilled a hole in the bottom, then screwed the stove through it (the gas canister can NOT be inside the bowl or it will get too hot and explode). I then bought some chain from home depot and BAM! Climbing stove. I can control the heat but the nob is really hard to turn when connected to the tin bowl. Jet Boil makes a stove specifically for camping on portaledges if that interests you.
Hey Logan, I am trying to start tree camping but am having a hard time finding rope. Websites selling static rope are very confusing and I don’t know which one to pick (if you know what I mean). If you have any suggestions on what rope I should get and where to buy it, any advise would be appreciated.
Yup. I love sterling htp 10mm or 11mm. Treestuff.com is where I buy my ropes.
I’ve climbed a lot of trees. Love it! But I’m not interested in climbing into the canopy to camp. I’m looking into buying a single portaledge with fly (maybe Fish) so that I can backpack into extremely rugged terrain and camp wherever there’s a tree with a branch at the right height. As long as I’m off the ground I’ll be happy. Camping on the side of a steep hill, or in a ravine filled with nothing but chunky boulders would be fabulous!